
# Spring Core
这里只记录 Spring 核心容器相关内容。

# 参考文档
- 图灵-周瑜 Spring
- wiki 极客学院 Spring 教程 (opens new window)
- 尚硅谷-王泽 Spring
- 笔记、示例代码资源,在百度云 (opens new window),联系我要密码
# Spring Core Container
- Spring Core Container 包括 Beans、Core、Context、Expression。
- 本文档主要记录 IOC 和 AOP 的内容。
ps
这里的架构图是从官方 4.3.27 Doc 中找出来的,所以可能有点对不上,不过没什么大问题。
# IOC
IOC,即 Inversion Of Control,控制反转。
- 把对象的创建和对象之间的调用过程,交给 Spring 管理。
- 使用 IOC 的目的:降低耦合。
- 实际上是通过反射实现的。
# 容器实现
IOC 思想基于 IOC 容器完成,IOC 容器底层就是对象工厂。
Spring 提供了容器的两种实现方式:(两个接口)
BeanFactory- 一般不提供给开发人员使用。
- 加载配置文件的时候,不创建对象,在
getBean的时候创建对象。
ApplicationContext- 是
BeanFactory的子接口,在BeanFactory接口之基础上做了封装,提供了更多功能。 - 开发人员使用。
- 分为单例和多例
- 单例
- 读取配置文件的时候,就创建对象。
- 多例
- getBean 的时候创建对象。
- 单例
- 是
# Bean 管理
分为两个操作:
- 创建对象
- 注入属性
- DI,依赖注入,就是注入属性的实现方式。
两种实现方式:
- 基于 XML 配置文件实现
- 基于注解实现
Spring 有两种类型 Bean:
- 普通 Bean
- FactoryBean
Spring Bean 作用域:
- singleton,默认
- prototype,多实例
# Bean 管理(注解实现)
该注解可以实现,将注解标注的类交给 Spring 进行管理。
等同于在配置文件中配置: <bean id="..." class="..." />
共 4 个注解:
@Component@Controller@Service@Repository
这里的 4 个注解,功能一样,只不过后面 3 个是语义化的。
示例:
// 默认的 id 值为类名首字母小写
// 等同于 <bean id="userService" class=".."/>

@Component(value = "userService")
public class UserService {
    public void add() {
        System.out.println("service add.......");
    }
}
2
3
4
5
6
7
8
9
# DI 自动装配 (注解实现)
@Autowired默认 byType 查找,如果找不到或者找到多个会转为 byName 去找,再找不到就报错。属性 require,
@Autowired(require = false)的时候,先去容器里面找,找不到也不报错。示例:
/** 1 先去容器里面找 Student 的实例。
    2 第 1 步有问题的话,再按照参数名(这里是 stu)去查找
*/
@AutoWired
Student stu;
1
2
3
4
5
@Qualified按照 name,结合@Autowired使用- 直接按照 qualified 的值去容器找这个名为这个值的实例。
@Resource默认按照 name 去查找,如果找不到或者找到多个,就转为按照 type 去找,最后都找不到就报异常。 如果@Resource注解使用了 name 属性,则只会 byName 去找,不再 byType 去找。@Value注入普通类型- 使用
@Value("${key}"),找不到 key 对应的值,则会把${key}赋给变量。 - 使用
@Value("#{beanName}"),可以注入 Bean。 - 可以组合注解使用。
- 使用
1 2 是 spring 包里面的,所以 spring 建议用 1 和 2。
3 是 javax 包的注解,只不过也可以实现功能。
示例:
(1)@Autowired:根据属性类型进行自动装配
// 第一步 把 service 和 dao 对象创建,在 service 和 dao 类添加创建对象注解
// 第二步 在 service 注入 dao 对象,在 service 类添加 dao 类型属性,在属性上面使用注解
@Service
public class UserService {
 //定义 dao 类型属性
 //不需要添加 set 方法
 //添加注入属性注解
    @Autowired
    private UserDao userDao;

    public void add() {
        System.out.println("service add.......");
        userDao.add();
    }
}

(2)@Qualifier:根据名称进行注入
// 这个 @Qualifier 注解的使用,和上面 @Autowired 一起使用
//定义 dao 类型属性
//不需要添加 set 方法
//添加注入属性注解
@Autowired //根据类型进行注入
@Qualifier(value = "userDaoImpl1") //根据名称进行注入
private UserDao userDao;

(3)@Resource:可以根据类型注入,可以根据名称注入
//@Resource //根据类型进行注入
@Resource(name = "userDaoImpl1") //根据名称进行注入
private UserDao userDao;

(4)@Value:注入普通类型属性
@Value(value = "abc")
private String name;
2
3
4
5
6
7
8
9
10
11
12
13
14
15
16
17
18
19
20
21
22
23
24
25
26
27
28
29
30
31
32
33
34
# 条件装配
@Configuration
@ComponentScan
public class AppConfig {
  @Bean
  @Profile("!test")
  ZoneId createZoneId() {
    return ZoneId.systemDefault();
  }

  @Bean
  @Profile("test")
  ZoneId createZoneIdForTest() {
    return ZoneId.of("America/New_York");
  }
}
2
3
4
5
6
7
8
9
10
11
12
13
14
15
- 如果当前的 Profile 设置为 test,则 Spring 容器会调用
createZoneIdForTest()创建 ZoneId,否则,调用createZoneId()创建 ZoneId。注意到@Profile("!test")表示非 test 环境。 - 在运行程序时,加上 JVM 参数
-Dspring.profiles.active=test就可以指定以 test 环境启动。
实际上,Spring 允许指定多个 Profile,例如:
-Dspring.profiles.active=test,master可以表示 test 环境,并使用 master 分支代码。
要满足多个 Profile 条件,可以这样写:
@Bean
@Profile({ "test", "master" }) // 同时满足test和master
ZoneId createZoneId() {
  ...
}
1
2
3
4
5
# 定制 Bean
有两种 Bean:
singleton,单例- 容器初始化时创建 Bean,容器关闭前销毁 Bean。
- 在容器运行期间,调用
getBean(Class)获取到的 Bean 总是同一个实例。
prototype,原型每次调用
getBean(Class),容器都返回一个新的实例。声明一个
Prototype的 Bean 时,需要添加一个额外的@Scope注解。示例:
@Component
@Scope(ConfigurableBeanFactory.SCOPE_PROTOTYPE) // @Scope("prototype")
public class MailSession {
  ...
}
1
2
3
4
5
# 创建第三方 Bean
如果一个 Bean 不在我们自己的 package 管理之内,例如 ZoneId,如何创建它?
答案是我们自己在 @Configuration 类中编写一个 Java 方法创建并返回它,注意给方法标记一个 @Bean 注解:
@Configuration
@ComponentScan
public class AppConfig {
  // 创建一个Bean
  // 默认 id 是方法名小写
  @Bean
  ZoneId createZoneId() {
    return ZoneId.of("Z");
  }
}
2
3
4
5
6
7
8
9
10
- Spring 对标记为
@Bean的方法只调用一次,因此返回的 Bean 仍然是单例。 - 创建之后使用容器获取创建的 Bean。
# @Bean
@Bean(autowireCandidate = false)表示该 Bean 不可以被注入到其他 Bean 中被使用。
# @ComponentScan
@ComponentScan,它告诉容器,自动搜索当前类所在的包以及子包,把所有标注为 @Component 的 Bean 自动创建出来,并根据 @Autowired 进行装配。
@ComponentScan 默认扫描指定包以及其子包下所有类,速度较慢。这时也可以选择建立扫描索引:
创建
resources -> META_INF -> spring.components文件内容:// Key 是累的全限定路径名,Value 是注解地址 com.xxx.test.User=org.springframework.stereotype.Component1
2这时候只会扫描该文件进行 Bean 的注册,不再扫描包下所有文件。
# @Configuration
详见这里
添加了这个注解就是 Full 配置 Bean(代理 Bean),其他方式均为 Lite Bean(普通 Bean)。
# 完全注解开发
- 添加了
@Configuration注解的类,就替代了 XML 配置文件。 @ComponentScan,它告诉容器,自动搜索当前类所在的包以及子包,把所有标注为@Component的 Bean 自动创建出来,并根据@Autowired进行装配。
# Bean 生命周期
Spring Bean 的生命周期,从创建到销毁:
# User 类
    User.class -> creatingSet 中存 beanName,表示这个 bean 正在创建
    -> 无参构造(推断构造方法,不一定是无参)
    -> 对象
    -> 放入 SingletonFactories 三级缓存,三级缓存中存放的是 <beanName, lambda>,lambda 中有 beanDefinition 和 无参构造创建出来的普通对象

    -> 依赖注入(给属性赋值)
        -> 单例池中取
        -> 判断是否出现循环依赖?如果出现循环依赖的话,需要提前进行 AOP。(单例池取不到的话,在 creatingSet 中取到了,表示出现循环依赖了,则提前进行 AOP,如果有 AOP)
        -> 二级缓存中取
        -> 三级缓存中取出来 lambda 表达式,然后执行 -> 生成 AOP 的代理对象 || 如果不需要 AOP 的话,这里产生的就是普通对象
        -> 放入二级缓存 -> 将三级缓存中的 lambda 移除

    --> postProcessor before

    -> 初始化前(@PostConstruct)
    -> 初始化(实现 InitializingBean 重写 afterPropertiesSet())
    -> 自定义初始化
    -> 初始化后(AOP)-> 代理对象 // 如果提前进行了 AOP 可以使用 CacheKey 在 earlyProxyReferences 中查到,如果可以查到,这里就不再执行 AOP 的操作。

    --> postProcessor after // AOP 就是使用后置处理器的 After 实现

    -> 放入 Map(单例池) 一级缓存 || -> 从二级缓存获取代理对象放入单例池
    -> creatingSet.remove(beanName)
    -> Spring Bean 对象

    -> destroy
2
3
4
5
6
7
8
9
10
11
12
13
14
15
16
17
18
19
20
21
22
23
24
25
26
27
@Async和 AOP 是不同的机制。- Spring 获取一个单例 Bean 的时候,会默认从单例池(Map)中获取,如果单例池中没有的话,则会走上述生命周期流程将 Bean 创建出来。
- 推断构造方法:
- 不指定使用哪个构造方法的情况(使用
@Autowired指定):- 类中有多个构造方法时,Spring 默认使用类的无参构造方法,如果没有无参构造,则报错。
- 只有一个有参方法不会报错,相当于添加了
@Autowired,因为只有一个有参构造的时候,该注解可以省略。
- 指定使用哪个构造方法的情况(使用
@Autowired指定):- 只有多个有参构造,必须使用
@Autowired表明使用哪个构造方法,即可以没有无参构造,无限制。
- 只有多个有参构造,必须使用
- 不指定使用哪个构造方法的情况(使用
- 后置处理器(postProcessor)
- AOP 就是基于后置处理器(After 中)实现的,AOP 就是实现了 BeanPostProcessor 接口的具体的 xxxProcessor。
- 继承
BeanPostProcessor接口 - 实现两个方法:
postProcessBeforeInitialization和postProcessAfterInitialization。
# 生命周期回调方法
生命周期回调方法有两种:
- 初始化方法:
ApplicationContext实例化 Bean 以后执行的方法,即注入属性之后执行的,set 方法之后执行的。
- 销毁方法:
ApplicationContext销毁前 调用的方法。
主要有:
- 初始化 回调方法:
- 使用
@PostConstruct标注的方法。预初始化 - 实现
InitializingBean接口后的回调方法afterPropertiesSet()方法。初始化 - 通过
init-method或default-init-method指定的方法。自定义初始化
- 使用
- 销毁 回调方法:
- 使用
@PreDestroy标注的方法。 - 实现
DisposableBean接口后的回调方法destroy()方法。 - 通过
destroy-method或default-destroy-method指定的方法。
- 使用
# Aware 接口
Aware 接口是(一个被容器管理的类)为了能够感知自身的一些属性。
实现 Aware 接口可以实现感知自身的一些属性,可以替代构造方法自注入等注入外部 Bean 方式。
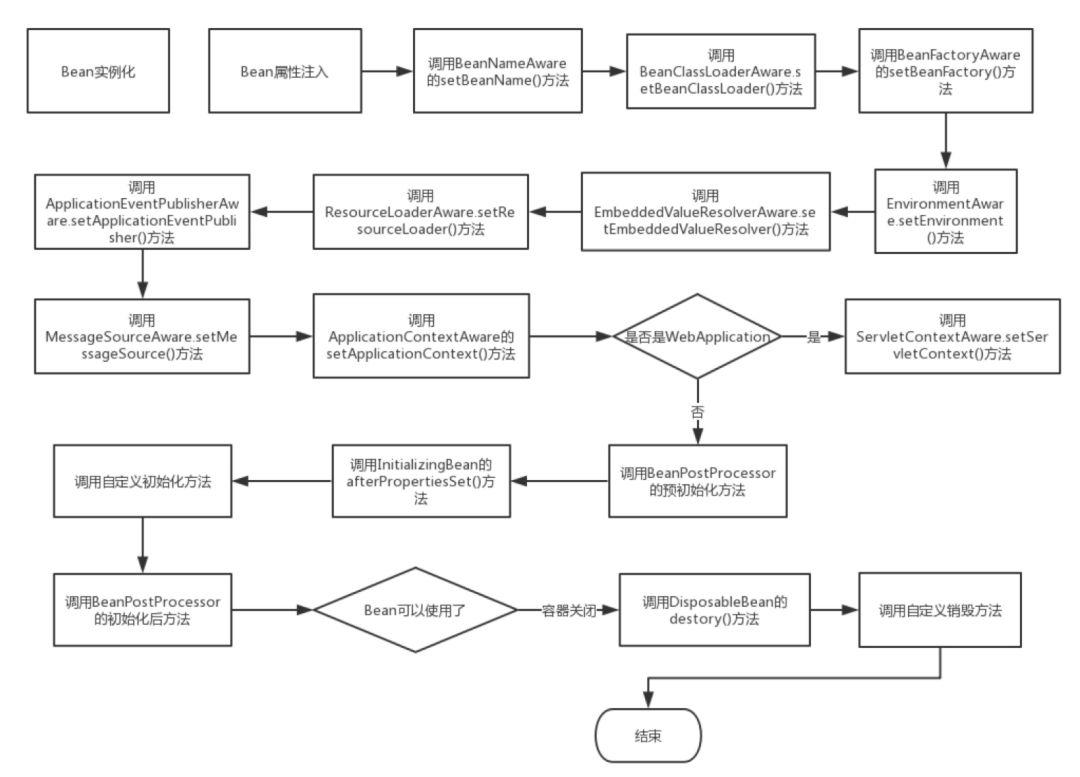
# Bean 加载顺序
Spring Bean 生命周期流程图:
# 循环依赖
Spring 使用三级缓存解决循环依赖问题,@Lazy 懒加载也能解决一些循环依赖问题。
三级缓存解决循环依赖
一级缓存 单例池 SingletonObjects
二级缓存 早期单例(未完成初始化的对象)池 earlySingletonObjects
三级缓存 代理缓存池 singletonFactories(<beanName, lambda()>)
二级缓存保证早期对象唯一,如果发生了循环依赖,并且需要提前 AOP,那么会提前生成代理对象,如果一个 A 同时被 B 和 C 使用发生了循环依赖的话,那么就会在 B 和 C 的生命周期中各自创建一个 A 的代理对象,这样的话 A 就不再唯一,这时候用到了二级缓存。
如果 User 做了 AOP 的话,那么根据Bean的生命周期,应该将 User 的代理对象存入单例池,
Spring 无法解决 构造方法注入 和 多例 bean 的循环依赖
可以使用 @Lazy 注解解决。
@Lazy 是先产生一个代理对象赋给属性,等到属性被使用的时候,才会将真正的对象创建出来。
# AOP
Aspect Oriented Programming,面向切面编程。
面向切面的编程思想是:不改变原有代码的情况下,添加新的功能。
- 即:将每个部分业务逻辑进行隔离,从而使得各部分之间的耦合度降低,提高程序的可重用性,进而提高开发效率。
# 底层原理-代理
AOP 底层使用代理实现。
代理的实现方式:
- 静态代理(AspectJ)
- 动态代理(Spring AOP)
- JDK 动态代理,基于接口,适用于有接口的情况,创建接口实现类的代理实例,由代理实例去实现实现类的行为。
- CGLIB,基于父子类,适用于没有接口的情况,创建代理类继承该类。
TIP
讲人话?不要急,先往下看。
# JDK 动态代理
适用于接口的实现类,代码结构为:
public interface UserService {
    int addUser(int a, int b);
}
---
public class UserServiceImpl implements UserService {
    @Override
    public int addUser(int a, int b) {
        System.out.println("addUser ....");
        return a + b;
    }
}
2
3
4
5
6
7
8
9
10
11
实现思想: 创建代理对象,让代理对象去替被代理的类执行它要做的事情。
实现步骤:
- 创建代理类实现
InvocationHandler接口 - 将被代理类传入代理类,即:将自己(被代理类)的行为交给代理类去实现
- 代理类返回一个被代理类的代理实例
- 第6行代码
- 代理实例执行方法,会调用代理类(实例)的
invoke方法,进行代理执行 - 在
invoke方法中可以实现 beforeMethod 与 afterMethod 阶段的处理
点击查看示例代码
public class JDKProxy implements InvocationHandler {
    private Object target;

    public Object JDKProxy(Object target) {
        this.target = target;
        return Proxy.newProxyInstance(target.getClass().getClassLoader(), target.getClass().getInterfaces(), this);
    }

    @Override
    public Object invoke(Object proxy, Method method, Object[] args) throws Throwable {
        // 我们在方法调用前后可以做一些处理,这实际就增强了方法。
        System.out.println("调用方法之前,");
        Object result = method.invoke(target, args);
        System.out.println("调用方法之后");
        return result;
    }
}
---
public static void main(String[] args) {
    JDKProxy jdkProxy = new JDKProxy();
    UserService userService = (UserService)jdkProxy.JDKProxy(new UserServiceImpl());
    int i = userService.addUser(1, 5);
    System.out.println(i);
}
---
// 执行结果
调用方法之前,
addUser ....
调用方法之后
6
2
3
4
5
6
7
8
9
10
11
12
13
14
15
16
17
18
19
20
21
22
23
24
25
26
27
28
29
30
Proxy 类内容:
- 包路径:
java.lang.reflect.Proxy; - 方法:
newProxyInstance,静态的 - 3 个参数:
ClassLoader loader,接口实现类的类加载器,即要代理的类的类加载器。- 获取方式:
target.getClass().getClassLoader() - 获取该类的加载器
- 获取方式:
Class<?>[] interfaces,接口实现类实现的接口(所有)- 获取方式:
target.getClass().getInterfaces() - 获取该类实现的所有接口
- 获取方式:
InvocationHandler h,实现了InvocationHandler接口的类
# CGLIB 动态代理
- Cglib是无法代理final修饰的方法的。
基于父子类去生成代理:生成一个被代理类的子类进行增强。
比如有一个类叫做 UserService,这个类里面有一个方法 test() 需要被增强。那么 CGLIB 的执行逻辑是,创建一个代理类继承该类,然后重写 test() 方法。
public class UserService {
    public void test() {
        //......
    }
}
---
public class Proxy extends UserService {
    // 将被代理对象存储在 target 中。
    private Object target;

    @OverWrite
    public void test() {
        // 处理增强逻辑
        target.test();
        // 处理增强逻辑
    }
}
2
3
4
5
6
7
8
9
10
11
12
13
14
15
16
17
既然 Proxy 类继承了被代理类,那为什么不直接使用 super.test(),而是将被代理对象存放到 target 中,然后调用 target.test(),因为这样的话,被代理对象可能还存储了其他信息,如果只是使用 super.test(),那么只是调用的一个类的方法而已。
# 静态代理 vs 动态代理
- 静态代理
- 也称为编译时增强,即在编译阶段就可生成 AOP 代理类,也就是在编译时直接将增强部分织入 class 文件。
- 在编译阶段完成,执行效率高。
- AspectJ 有自己的编译器,AspectJ compiler,简称 ajc。
- AspectJ 可以在任何类上实现。
- AspectJ 提供完整的 AOP 实现方案。
- 动态代理
- 也称为运行时增强,运行时借助于 JDK 动态代理、CGLIB 等在内存中“临时”生成 AOP 动态代理类实现。
- 动态代理会增加调用栈的深度,所以效率没有静态代理高。
- Spring AOP 的编译器是 Java compiler。
- Spring AOP 只能在 Spring 容器管理的 bean 上实现代理。
- Spring AOP 只提供常用的 AOP 实现。
# AOP 术语
- JoinPoint: 连接点
- Pointcut: 切入点
- Advice: 通知/增强
- Aspect: 切面
- Target Object: 切入点所在类,被增强的对象。
- Weaving:织入
TIP
增强,当一个方法被代理执行的时候,我们可以选择在方法前后添加处理,这就是增强了方法。
# JoinPoint 连接点
类中哪些方法可以被增强,这些方法就叫做连接点。
示例:
class User {
    void addUser() {
        ...
    }
    void updateUser() {
        ...
    }
}
// 这个类中的两个方法都可以进行增强,那么,这个类就有两个连接点
2
3
4
5
6
7
8
9
# Pointcut 切入点
实际被增强的方法,称为切入点。
# Advice 增强(通知)
方法执行前后的处理部分,就是指那些实际增强的代码部分,称为通知,即增强。
通知有 5 种类型:
- 前置通知,before
- 后置通知,afterReturning
- 环绕通知,around
- 异常通知,afterThrowing
- 最终通知,after
# Aspect 切面
一个动作,即:将通知应用到切入点的过程。
# Weaving 织入
将增强添加对目标类具体切入点上的过程。
# AspectJ 的使用
在 Spring 中一般借助 AspectJ 来进行更好的实现 AOP。
# 简介
AspectJ 不是 Spring 的组成部分,它是一个独立的 AOP 框架,一般使用 AspectJ 结合 Spring 一起使用,进行 AOP 操作。
# 实现 AOP 的两种方式
- 基于 XML 配置文件
- 基于注解
# 切入点表达式
execution([权限修饰符] [返回类型] [类全路径] [方法名] ([参数列表]))
示例:
对
com.xxx.dao.UserDao类中的add方法进行增强。execution(* com.xxx.dao.UserDao.add(..))- 访问修饰符可以省略,默认是 public。
- 返回值可以使用 * ,表示所有的类型。
对
com.xxx.dao.UserDao类中的 所有 方法进行增强。execution(* com.xxx.dao.UserDao.*(..))两个点省略参数
# AOP 操作(基于注解)
引入依赖
<dependency>
    <groupId>org.springframework.boot</groupId>
    <artifactId>spring-boot-starter-aop</artifactId>
</dependency>
1
2
3
4PS:一开始这里会疑惑,因为 AspectJ 不属于 Spring,是一个独立框架,为什么只引入
spring-boot-starter-aop。这里点击进入
spring-boot-starter-aop,会看到其实它内部已经将 AspectJ 相关的依赖引入了:点击查看示例代码
<dependencies>
<dependency>
    <groupId>org.springframework.boot</groupId>
    <artifactId>spring-boot-starter</artifactId>
    <version>2.5.4</version>
    <scope>compile</scope>
</dependency>
<dependency>
    <groupId>org.springframework</groupId>
    <artifactId>spring-aop</artifactId>
    <version>5.3.9</version>
    <scope>compile</scope>
</dependency>
<dependency>
    <groupId>org.aspectj</groupId>
    <artifactId>aspectjweaver</artifactId>
    <version>1.9.7</version>
    <scope>compile</scope>
</dependency>
</dependencies>
1
2
3
4
5
6
7
8
9
10
11
12
13
14
15
16
17
18
19
20spring 的 starter 依赖会将指定场景可能用到的所有依赖添加进去。
- 在这里则是,
spring-boot-starter-aop(AOP 场景 starter),集成了可能会用到的 aop 相关依赖。
- 在这里则是,
编写普通类与代理类
@Component
public class User {
    public void add(){
        System.out.println("add ...");
    }
}
---
@Aspect
@Component
public class UserProxy {
    // 前置通知
    @Before(value = "execution(* com.example.demo.aspect.User.add(..))")
    public void before() {
        System.out.println("before ...");
    }
}
---
执行结果:
before ...
add ...
1
2
3
4
5
6
7
8
9
10
11
12
13
14
15
16
17
18
19
20- 代理类上添加
@Aspect,声明这是个切面,然后使用@Component,交给 Spring 容器。- Spring 引入 AspectJ,实质只是使用了 AspectJ 的 Library 来解析、匹配 pointcut,最终的实现还是 Spring 去做的,所以要交给 Spring 容器。
- 增强上添加对应增强/通知类型注解(往下看)
- 代理类上添加
# 通知类型
@Before,待增强方法之前@After,方法之后,无论异常与否,都执行(最终通知)@AfterReturning,方法之后,方法正常返回后执行(后置/返回通知)@AfterThrowing,异常后执行@Around,环绕方法ProceedingJoinPoint,参数示例:
@Around(value = "execution(* com.example.demo.aspect.User.add(..))")
public void Around(ProceedingJoinPoint proceedingJoinPoint) throws Throwable {
    System.out.println("方法前面 ...");
    proceedingJoinPoint.proceed();
    System.out.println("方法后面 ...");
}
1
2
3
4
5
6
# 增强内获取切入点的数据
方法内通过 JoinPoint 获取切入点的内容:
- 参数
- 所在类
- ...
点击查看示例代码
User user = new User();
user.setName("wow56");
user.setAge(18);
userService.addUser("hello", 56, user);
---
@Component
public class UserService {
  public void addUser(String a, int b, User user) {
    System.out.println(String.format("原始方法,第一个参数:%s,第二个参数:%d,第三个参数:%s", a, b, user));
  }
}
---
@Before(value = "execution(* com.example.demo.proxytest.UserService.addUser(..))")
public void before(JoinPoint joinPoint) {
    Object[] args = joinPoint.getArgs();
    System.out.println("第一个参数:"+args[0]);
    System.out.println("第二个参数:"+args[1]);
    System.out.println("第三个参数:"+args[2]);
    System.out.println("前置增强 ...");
}
---结果
第一个参数:hello
第二个参数:56
第三个参数:User(name=wow56, age=18)
前置增强 ...
原始方法,第一个参数:hello,第二个参数:56,第三个参数:User(name=wow56, age=18)
2
3
4
5
6
7
8
9
10
11
12
13
14
15
16
17
18
19
20
21
22
23
24
25
26
# 执行顺序
没有报异常的情况
Around 方法前面 ...
before ...
我是原始方法 ...
Around 方法后面 ...
after ...
after Returning ...
1
2
3
4
5
6PS:Spring 版本不同可能增强的执行顺序不一样,但是 before 一定是在 after 之前的。
从 Spring 5.2.7 开始,通知执行的优先级顺序: Around、Before、After、AfterReturning、AfterThrowing。
异常情况下
Around 方法前面 ...
before ...
after ...
after 异常 ...
1
2
3
4
# 切入点的抽取
目的:解耦
抽取切入点之后,只需要修改切入点就可以了。
使用
@Pointcut点击查看示例代码
@Aspect
@Component
public class UserProxy {
    // 抽取切入点
    @Pointcut(value = "execution(* com.example.demo.aspect.User.add(..))")
    public void userAddPoint() {
    }

    // 前置通知
    @Before(value = "userAddPoint()")
    public void before() {
        System.out.println("before ...");
    }

    // 后置通知
    @After(value = "userAddPoint()")
    public void after() {
        System.out.println("after 正常 ...");
    }

    @AfterReturning(value = "userAddPoint()")
    public void afterReturning() {
        System.out.println("after 最终 ...");
    }

    @AfterThrowing(value = "userAddPoint()")
    public void afterThrowing() {
        System.out.println("after 异常 ...");
    }

    @Around(value = "userAddPoint()")
    public void Around(ProceedingJoinPoint proceedingJoinPoint) throws Throwable {
        System.out.println("方法前面 ...");
        proceedingJoinPoint.proceed();
        System.out.println("方法后面 ...");
    }
}
1
2
3
4
5
6
7
8
9
10
11
12
13
14
15
16
17
18
19
20
21
22
23
24
25
26
27
28
29
30
31
32
33
34
35
36
37
# 多个代理的执行顺序
如果有一个 UserProxy 增强了 User 的 add(),这时还有一个 PersonProxy 也增强了 User 的 add(),这时候这两个代理的增强顺序就冲突了。
使用
@Order(数字类型的值),值越小,优先级越高。@Order(1)的优先级比@Order(2)的优先级高。
示例:
点击查看示例代码
@Order(1)
@Aspect
@Component
public class UserProxy {

    @Pointcut(value = "execution(* com.example.demo.aspect.User.add(..))")
    public void userAddPoint() {
    }

    // 前置通知
    @Before(value = "userAddPoint()")
    public void before() {
        System.out.println("userproxy before ...");
    }

    @Around(value = "userAddPoint()")
    public void Around(ProceedingJoinPoint proceedingJoinPoint) throws Throwable {
        System.out.println("userProxy around before ...");
        proceedingJoinPoint.proceed();
        System.out.println("userProxy around after ...");
    }
}
---
@Order(2)
@Aspect
@Component
public class PersonProxy {

    @Pointcut(value = "execution(* com.example.demo.aspect.User.add(..))")
    public void userAddPoint() {
    }

    // 前置通知
    @Before(value = "userAddPoint()")
    public void before() {
        System.out.println("personproxy before ...");
    }

    @Around(value = "userAddPoint()")
    public void Around(ProceedingJoinPoint proceedingJoinPoint) throws Throwable {
        System.out.println("personProxy around before ...");
        proceedingJoinPoint.proceed();
        System.out.println("personProxy around after ...");
    }
}
---
userProxy around before ...
userproxy before ...
personProxy around before ...
personproxy before ...
我是原始方法 ...
personProxy around after ...
userProxy around after ...
1
2
3
4
5
6
7
8
9
10
11
12
13
14
15
16
17
18
19
20
21
22
23
24
25
26
27
28
29
30
31
32
33
34
35
36
37
38
39
40
41
42
43
44
45
46
47
48
49
50
51
52
53注意:
Around的before和after中,- 优先级高的,
before在前面,after在后面。
- 优先级高的,
# 注解实现 AOP
@annotation 的作用是扫描所有添加了这个注解的方法(连接点)。
- 示例:
@annotation(com.xxx.annotation.MyAnnotation)
# 无参注解
无参注解和普通的用法一致,
点击查看示例代码
@Target(ElementType.METHOD)
@Retention(RetentionPolicy.RUNTIME)
public @interface MyAnnotation {
}
---
@MyAnnotation
@GetMapping("/get")
public String getUser(){
    System.out.println("get 方法 。。。");
    return null;
}
---
@Component
@Aspect
public class MyAnnotationAspect {
    @Pointcut(value = "@annotation(com.example.demo.annotation.MyAnnotation)")
    public void myAnnotationPointcut() {
    }

    @Before(value = "myAnnotationPointcut()")
    public void before(JoinPoint joinPoint) {
        // 使用 JoinPoint 可以获得被增强方法的入参等信息。
        System.out.println("前置方法 。。。");
    }
}
---执行结果
前置方法 。。。
get 方法 。。。
1
2
3
4
5
6
7
8
9
10
11
12
13
14
15
16
17
18
19
20
21
22
23
24
25
26
27
28
# 有参注解
在 @Before 注解的 value 指定调用的切点方法,并且要加上 && @annotation(注解名称)
注解名称自定义,但是此处的注解名称要和增强方法的参数名一致。
如图:

注意: 参数名可以自定义,但是两处要一致。
点击查看示例代码
@Target(ElementType.METHOD)
@Retention(RetentionPolicy.RUNTIME)
public @interface MyAnnotation {
    String value() default "122";
}
---
@MyAnnotation(value = "222")
@GetMapping("/get")
public String getUser(){
    System.out.println("get 方法 。。。");
    return null;
}
---
@Component
@Aspect
public class MyAnnotationAspect {
    @Pointcut(value = "@annotation(com.example.demo.annotation.MyAnnotation)")
    public void myAnnotationPointcut() {
    }

    @Before(value = "myAnnotationPointcut() && @annotation(myAnnotation)")
    public void before(MyAnnotation myAnnotation) {
        System.out.println("前置方法 。。。" + myAnnotation.value());
    }
}
---执行结果
前置方法 。。。222
get 方法 。。。
2
3
4
5
6
7
8
9
10
11
12
13
14
15
16
17
18
19
20
21
22
23
24
25
26
27
28
# AspectJ 切点函数
Spring 默认使用 AspectJ 切入点表达式语言。
# 函数列表
- 方法切点函数
execution()- 入参:方法匹配模式串
- 说明:满足某一匹配模式的所有目标类方法连接点
@annotation()- 入参:方法注解类名
- 说明:标注了特定注解的目标方法连接点
- 方法入参切点函数
args()- 入参:类名
- 说明:定位于入参为特定类型的方法的连接点
@args()- 入参:类型注解类名
- 说明:定位于被特定注解所标注入参的方法的连接点
- 目标类切点函数
within()- 入参:类名匹配串
- 说明:定位于特定作用域下的所有连接点
target()- 入参:类名
- 说明:定位于指定类及其子类
@within()- 入参:类型注解类名
- 说明:定位与标注了特定注解的类及其实现类
@target()- 入参:类型注解类名
- 说明:定位于标注了特定注解的目标类里所有方法
- 代理类切点函数
this()- 入参:类名
- 说明:代理类按类型匹配与指定类,则被代理的目标类的所有连接点都匹配与该切点
# 事务
如果一个类的某个方法上添加了 @Transactional 注解,那么这个类就会产生一个代理对象,方法执行的是代理对象的方法。
事务管理器新建一个数据库连接 conn -> 放到 ThreadLocal 中,conn.autocommit = false,关闭自动提交后,将所有的 sql 先存在起来,如果方法不报错,那么将这些 sql 提交,否则 rollback。
# 事务失效
执行的普通类,而不是代理类,导致事务失效,可以注入自身。
一个添加了 @Transactional 注解的方法中,调用了自身的方法,这时候,被调用的自身的那个方法,实际上是被普通对象调用的,而不是 单例池中的代理对象调用的。如果不是 Spring 管理的类,那么就不会走代理逻辑,那么注解自然就失效了。
@Configuration 注解类也是代理类
# 解决方式
- 自己注入自己(Spring 允许的)
AopContext.currentProxy()获取代理对象使用代理对象执行逻辑。
# 讨论区
由于评论过多会影响页面最下方的导航,故将评论区做默认折叠处理。