
# Vue
# 参考文档
# 注意
不要在选项
property或回调上使用箭头函数, 比如:created: () => console.log(this.a) // 或 vm.$watch('a', newValue => this.myMethod())。1
2
3因为箭头函数并没有
this,this会作为变量一直向上级词法作用域查找,直至找到为止,经常导致Uncaught TypeError: Cannot read property of undefined或Uncaught TypeError: this.myMethod is not a function之类的错误。
# 模板语法
# 指令
实例:
<a v-bind:href="url">...</a>
在这里 href 是参数,告知 v-bind 指令将该元素的 href 属性与表达式 url 的值绑定。
# 计算属性和侦听器
- 计算属性
computed - 侦听器
watch实例:
watch: {
  变量:function() {
    。。。
  }
}
```D

监听变量,如果变量变化了,那么执行后边的函数。
1
2
3
4
5
6
7
8
9
# Class 和 Style 绑定
实例:
// html
<div
  class="static"
  v-bind:class="{ active: isActive, 'text-danger': hasError }"
></div>
// data
data: {
  isActive: true,
  hasError: false
}
// 渲染结果
<div class="static active"></div>
2
3
4
5
6
7
8
9
10
11
12
# v-for 遍历
格式:
<li  v-for="(food, index) in foods" :key="food.name">
  {{index + food.name}}
</li>
2
3
如果要遍历的是一个对象,那么要遍历对象的所有属性,这时候是按照 Object.keys() 进行遍历的。
格式:
v-for="(item, key, index) in list"
有三个参数: (1)属性值,(2)键名,(3)index,这里的先后顺序与参数名无关,与参数顺序有关。
格式:
// 支持输入数字,这里是打印从 1 到 5。
v-for="item in 5"
2
注意:v-for 比 v-if 优先级高。
# v-on 事件处理
# 事件修饰符
.stop.prevent.capture.self.once.passive
实例:
<!-- 阻止单击事件继续传播 -->
<a v-on:click.stop="doThis"></a>

<!-- 提交事件不再重载页面 -->
<form v-on:submit.prevent="onSubmit"></form>

<!-- 修饰符可以串联 -->
<a v-on:click.stop.prevent="doThat"></a>

<!-- 只有修饰符 -->
<form v-on:submit.prevent></form>

<!-- 添加事件监听器时使用事件捕获模式 -->
<!-- 即内部元素触发的事件先在此处理,然后才交由内部元素进行处理 -->
<div v-on:click.capture="doThis">...</div>

<!-- 只当在 event.target 是当前元素自身时触发处理函数 -->
<!-- 即事件不是从内部元素触发的 -->
<div v-on:click.self="doThat">...</div>
2
3
4
5
6
7
8
9
10
11
12
13
14
15
16
17
18
19
注意: 使用修饰符时,顺序很重要;相应的代码会以同样的顺序产生。因此,用 v-on:click.prevent.self 会阻止所有的点击,而 v-on:click.self.prevent 只会阻止对元素自身的点击。
# v-model 表单数据绑定
- 多个复选框绑定到一个数组中,这样的每个值选中后都会被放进去。
# 修饰符
.lazy在默认情况下,v-model 在每次 input 事件触发后将输入框的值与数据进行同步 (除了上述输入法组合文字时)。你可以添加 lazy 修饰符,从而转为在 change 事件_之后_进行同步:
实例:
  <!-- 在“change”时而非“input”时更新 -->
  <input v-model.lazy="msg">
1
2
.number如果想自动将用户的输入值转为数值类型,可以给 v-model 添加 number 修饰符:
实例:
<input v-model.number="age" type="number">1这通常很有用,因为即使在
type="number"时,HTML 输入元素的值也总会返回字符串。如果这个值无法被parseFloat()解析,则会返回原始的值。
.trim如果要自动过滤用户输入的首尾空白字符,可以给 v-model 添加 trim 修饰符:
实例:
<input v-model.trim="msg">1
# 组件基础
组件是可复用的 Vue 实例,且带有一个名字。
实例:
# 格式
    <div id="components-demo">
      <button-counter></button-counter>
    </div>

    <script>
      Vue.component('button-counter', {
        // data 必须是一个函数
        data: function()  {
          return {count: 0}
        },
        template: '<button v-on:click="count++"> You clicked me {{ count }} times.</button>'
      })

      new Vue({
        el: '#components-demo'
      })
    </script>
2
3
4
5
6
7
8
9
10
11
12
13
14
15
16
17
# 通过 Prop 向子组件传递数据
格式:
  Vue.component('blog-post', {
    props: ['title'],
    template: '<h3>{{ title }}</h3>'
  })
2
3
4
一个组件默认可以拥有任意数量的 prop,任何值都可以传递给任何 prop。在上述模板中,你会发现我们能够在组件实例中访问这个值,就像访问 data 中的值一样。
一个 prop 被注册之后,你就可以像这样把数据作为一个自定义 attribute 传递进来:
  <blog-post title="My journey with Vue"></blog-post>
  <blog-post title="Blogging with Vue"></blog-post>
  <blog-post title="Why Vue is so fun"></blog-post>
2
3
实例:
  <div id="components-prop">
      <button-counter v-bind:a-tr="abb"></button-counter>
    </div>

    <script>
      Vue.component('button-counter', {
        data: function()  {
          return {count: 0}
        },
        props: ['aTr'],
        template: '<button v-on:click="count++"> You clicked me {{ count }} times.+ {{ aTr }}</button>'
      })

      new Vue({
        el: '#components-prop',
        data: function()  {
          return {abb: '222'}
        },
      })
    </script>
2
3
4
5
6
7
8
9
10
11
12
13
14
15
16
17
18
19
20
注意: 这里的 div 标签中的属性名是 a-tr,但是在模板与实例中,这里是 aTr。这里有个自动转换的问题,要注意。
# 在组件上使用 v-model
# prop
# prop 验证
格式:
Vue.component('my-component', {
  props: {
    // 基础的类型检查 (`null` 和 `undefined` 会通过任何类型验证)
    propA: Number,
    // 多个可能的类型
    propB: [String, Number],
    // 必填的字符串
    propC: {
      type: String,
      required: true
    },
    // 带有默认值的数字
    propD: {
      type: Number,
      default: 100
    },
    // 带有默认值的对象
    propE: {
      type: Object,
      // 对象或数组默认值必须从一个工厂函数获取
      default: function () {
        return { message: 'hello' }
      }
    },
    // 自定义验证函数
    propF: {
      validator: function (value) {
        // 这个值必须匹配下列字符串中的一个
        return ['success', 'warning', 'danger'].indexOf(value) !== -1
      }
    }
  }
})
2
3
4
5
6
7
8
9
10
11
12
13
14
15
16
17
18
19
20
21
22
23
24
25
26
27
28
29
30
31
32
33
- 值可以传进来,但是控制台会有提示。
- 传入的是一个对象(包括数组)的时候,不能直接传进去,需要用v-bind。
# 自定义组件
# 事件名
- 烤串风
# 插槽
# 具名插槽
<slot> 有一个属性 name,不具名的默认名字是 default。
- 缩写:
<!-- 绑定name = header 的插槽 -->
<template v-slot:header>
  ...
</template>
<!-- 缩写为 -->
<template #header>
  ...
</template>
2
3
4
5
6
7
8
# Vue Router
# 简介
起步,基本实例:
<!-- HTML -->
  <script src="https://unpkg.com/vue/dist/vue.js"></script>
  <script src="https://unpkg.com/vue-router/dist/vue-router.js"></script>

  <div id="app">
    <h1>Hello App!</h1>
    <p>
      <!-- 使用 router-link 组件来导航. -->
      <!-- 通过传入 `to` 属性指定链接. -->
      <!-- <router-link> 默认会被渲染成一个 `<a>` 标签 -->
      <router-link to="/foo">Go to Foo</router-link>
      <router-link to="/bar">Go to Bar</router-link>
    </p>
    <!-- 路由出口 -->
    <!-- 路由匹配到的组件将渲染在这里 -->
    <router-view></router-view>
  </div>
2
3
4
5
6
7
8
9
10
11
12
13
14
15
16
17
// JS
  // 0. 如果使用模块化机制编程,导入Vue和VueRouter,要调用 Vue.use(VueRouter)

  // 1. 定义 (路由) 组件。
  // 可以从其他文件 import 进来
  const Foo = { template: '<div>foo</div>' }
  const Bar = { template: '<div>bar</div>' }

  // 2. 定义路由
  // 每个路由应该映射一个组件。 其中"component" 可以是
  // 通过 Vue.extend() 创建的组件构造器,
  // 或者,只是一个组件配置对象。
  // 我们晚点再讨论嵌套路由。
  const routes = [
    { path: '/foo', component: Foo },
    { path: '/bar', component: Bar }
  ]

  // 3. 创建 router 实例,然后传 `routes` 配置
  // 你还可以传别的配置参数, 不过先这么简单着吧。
  const router = new VueRouter({
    routes // (缩写) 相当于 routes: routes
  })

  // 4. 创建和挂载根实例。
  // 记得要通过 router 配置参数注入路由,
  // 从而让整个应用都有路由功能
  const app = new Vue({
    router
  }).$mount('#app')

  // 现在,应用已经启动了!
2
3
4
5
6
7
8
9
10
11
12
13
14
15
16
17
18
19
20
21
22
23
24
25
26
27
28
29
30
31
32
- 通过注入路由器,我们可以在任何组件内通过
this.$router访问路由器,也可以通过this.$route访问当前路由。实例:
// Home.vue
  export default {
    computed: {
      username() {
        // 我们很快就会看到 `params` 是什么
        return this.$route.params.username
      }
    },
    methods: {
      goBack() {
        window.history.length > 1 ? this.$router.go(-1) : this.$router.push('/')
      }
    }
  }
1
2
3
4
5
6
7
8
9
10
11
12
13
14注意:当
<router-link>对应的路由匹配成功,将自动设置 class 属性值.router-link-active。
# 动态路由匹配
一个“路径参数”使用冒号
:标记。当匹配到一个路由时,参数值会被设置到this.$route.params,可以在每个组件内使用。path: '/user/:id'1
/user/foo 和 /user/bar 都会映射到这里。
- 可以使用通配符 *
# 编程式路由
  const userId = '123'
  router.push({ name: 'user', params: { userId }}) // -> /user/123
  router.push({ path: `/user/$ {userId}` }) // -> /user/123
  // 这里的 params 不生效
  router.push({ path: '/user', params: { userId }}) // -> /user\
2
3
4
5
# 组件化开发(待整理)
# 介绍
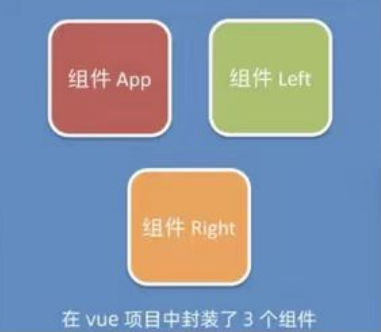
Vue 是一个支持组件化开发的前端框架。Vue 中规定,组件的后缀名是 .vue。之前接触到的 App.vue 文件本质上就是一个 Vue 的组件。
# 组件的组成
每个 Vue 组件都由 3 部分构成,分别是: template、script、style。
其中,每个组件中必须包含 template 模板结构,而 script 行为和 style 样式是可选的组成部分。
template定义: vue 规定 每个组件对应的模板结构,需要定义到
<template>节点中。<template> <!-- 当前组件的 DOM 结构,需要定义到 template 标的内部 --> </template>1
2
3注意:
template是 Vue 提供的容器标签,只起到包裹性质的作用,它不会被渲染为真正的 DOM 元素。template中只能包含唯一的根节点。script定义: vue 规定 开发者可以在
<script>节点中封装组件的 JavaScript 业务逻辑。<script>节点的基本结构如下:<script> // 组件相关的 data 数据、methods 方法停//部篇要定义到 export default 所导出的对象中 export default {} </script>1
2
3
4注意: vue规定: vue 组件中的 data 必须是一个函数,不能直接指向一个数据对象
style定义: vue规定: 组件内的
<style>节点是可选的,开发者可以在<style>节点中编写样式美化当前组件的 UI结构:<style> h1{ font-weight: normal; } </style>1
2
3
4
5注意: 在
<style>标签上添加lang="less"属性,即可使用 less 语法编写组件的样式:
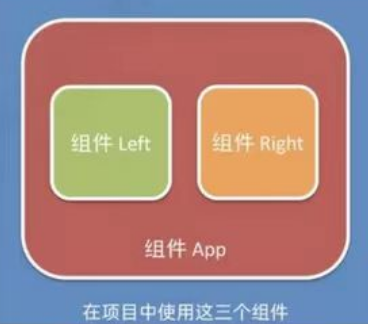
# 组件之间的父子关系
组件在被封装好之后,彼此之前是相互独立的,不存在父子关系。
只有在使用的时候,根据彼此的嵌套关系,形成了父子关系、兄弟关系。
# 使用组件的三个步聚
步骤1: 使用
impot语法导入需要的组件步骤2: 使用
components节点注册组件步骤3: 以标签形式使用刚才注册的组件
// 1
import Left from "@/components/Left.vue"
// 2
export default {
  ...,
  components: { Left },
  ...
}
// 3
<diy class="box">
  <Left>...</Left>
</div>
1
2
3
4
5
6
7
8
9
10
11
12
# 组件间数据传输
Vue 遵守单向数据流原则,父组件数据可以传递给子组件,子组件也可以正常获取并使用由父组件传过来的数据;但是,子组件中不能直接修改父组件传过来的数据,必须要向父组件传递一个事件来父组件需要修改数据,即通过子组件的操作,在父组件中修改数据。
父传子
props,父组件通过属性绑定的形式将数据传递给子组件,并在子组件中定义 props 来接收。父传给子的props。// 父组件 <template> <div> <child-component :message="parentMessage"></child-component> </div> </template> <script> import ChildComponent from './ChildComponent.vue'; export default { components: { ChildComponent, }, data() { return { parentMessage: 'Hello from parent', }; }, }; </script> // 子组件 <template> <div> <p>{{ message }}</p> </div> </template> <script> export default { props: { message: { type: String, required: true, }, }, }; </script>1
2
3
4
5
6
7
8
9
10
11
12
13
14
15
16
17
18
19
20
21
22
23
24
25
26
27
28
29
30
31
32
33
34
35
36
37
38
39子传父
$emit,通过在子组件中使用$emit方法触发自定义事件,然后在父组件中使用v-on指令监听该事件并执行相应的逻辑。这样子组件就可以向父组件发送消息或传递数据。// 父组件 <template> <div> <child-component @custom-event="handleCustomEvent"></child-component> </div> </template> <script> import ChildComponent from './ChildComponent.vue'; export default { components: { ChildComponent, }, methods: { handleCustomEvent(payload) { console.log('Received payload:', payload); }, }, }; </script> // 子组件 <template> <div> <button @click="triggerEvent">Trigger Event</button> </div> </template> <script> export default { methods: { triggerEvent() { this.$emit('custom-event', 'Hello from child'); }, }, }; </script>1
2
3
4
5
6
7
8
9
10
11
12
13
14
15
16
17
18
19
20
21
22
23
24
25
26
27
28
29
30
31
32
33
34
35
36
37
38parent和children:通过访问父组件的this.parent或子组件的this.children属性来直接访问父组件或子组件的实例,并进行数据传递// 父组件 <template> <div> <child-component></child-component> </div> </template> <script> import ChildComponent from './ChildComponent.vue'; export default { components: { ChildComponent, }, data() { return { parentMessage: 'Hello from parent', }; }, mounted() { console.log(this.$children); // 子组件实例数组 console.log(this.$children[0].message); // 子组件实例的message属性 }, }; </script> // 子组件 <template> <div> <p>{{ message }}</p> </div> </template> <script> export default { data() { return { message: 'Hello from child', }; }, mounted() { console.log(this.$parent); // 父组件实例 console.log(this.$parent.parentMessage); // 父组件实例的parentMessage属性 }, }; </script>1
2
3
4
5
6
7
8
9
10
11
12
13
14
15
16
17
18
19
20
21
22
23
24
25
26
27
28
29
30
31
32
33
34
35
36
37
38
39
40
41
42
43
44
45
46通过在子组件上添加
ref属性,并指定一个唯一的名称,来创建一个引用。然后可以使用this.$refs对象来访问这个引用,以获取对应的子组件实例。<template> <div> <child-component ref="myChild"></child-component> </div> </template> <script> import ChildComponent from './ChildComponent.vue'; export default { components: { ChildComponent, }, mounted() { console.log(this.$refs.myChild); // 获取子组件实例 console.log(this.$refs.myChild.message); // 访问子组件实例的属性 }, }; </script>1
2
3
4
5
6
7
8
9
10
11
12
13
14
15
16
17
18
19放在 Vuex store 中。
# 讨论区
由于评论过多会影响页面最下方的导航,故将评论区做默认折叠处理。
点击查看评论区内容,渴望您的宝贵建议~
← Vue 总览